25 Aug 2016

How to make a USB Bootable Using Command Prompt

Making a usb bootable using cmdprompt:

First of all go to start menu and open the command prompt.
in the command prompt write the below code:

diskpart

after that it will prompt to User Account Control and click on yes and it will take you to another command based Window just below:

then in the diskpart command prompt window write the below code step by step:
Diskpart Command for booting windows on USB Using cmd
Diskpart command for booting usb
Diskpart
list disk
select disk {number}
clean
create partition primary
select partition 1
active
format fs=fat32 quick
assign
exit


Note: Before making your usb bootable make sure that you have no important data in your USB/ flash drive because all the data is wiped during the formatting of USB by using format fs=fat32 quikck command.

Change MAC Address in Windows

Change MAC Address in Windows

It is not advised to change the MAC address on networks as it may create conflicts and sometimes, may fail to appear on the network. But if you want to change the MAC address for some reason, it is an easy process.
1.    Press Windows Key + Break or Pause key to open System Properties window. If the Pause key is combined with the Shift key, you may need to press Win+Fn+Pause key.
2.    Click on Device Manager to the left side of the System window
3.    Once the Device Manager dialog appears, look for the category named Network Adaptors
4.    Click on the plus sign preceding Network Adaptors to see all the Network cards attached to your computer;
5.    Select the network adaptor whose MAC address you wish to change
6.    Right click on the network adaptor and select Properties
7.    Click on the Advanced tab.
8.    In the list of available options, select Locally Administered MAC Address or Network Address; note that only one of the two options will appear based on the type of your network adaptor
9.    When you select one of the above options, you will get a text box saying Value.
10.    Type a six digit alphanumeric code in the Value field after selecting the radio button; note that you do not have to type the dashes or full colon; if you wish to type 00:4f:gH:HH:88:80, you simply type 004fgHHH8880 without any dashes or full colons; adding dashes may result in error
11.    Click OK to close the dialog box
12.    Close other open dialog boxes (if any) and close the Device Manager

That is the simplest method to change the MAC (Media Access Control) ID of the network adaptor.

You can also use some of these free MAC Address Changer Tools.

Types of Ethernet 4 pairs Twisted cable:


The Ethernet 4 pairs twisted cable is mainly divided into three categories:

1- Straight Cable:

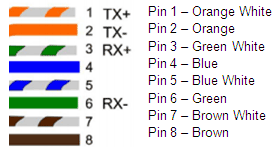
This cable is mainly used for communicating b/w two different devices. It can be made very simple /easily. You should to keep the same color combination on both the ends of the connector. Here I am mentioning here the standard color combination which you had to keep on both the end:
Straight Cable Standard

Straight Cable Color Coding
          End A---------------------------------------------------End B
  • White Orange ------------------------------------White Orange 
  • Orange -------------------------------------------- Orange 
  • White Green -------------------------------------- White Green 
  • Blue ------------------------------------------------ Blue 
  • White Blue ----------------------------------------- White Blue 
  • Green ----------------------------------------------- Green 
  • White Brown -------------------------------------- White Brown 
  • Brown ----------------------------------------------- Brown 


2- Cross Over Cable:

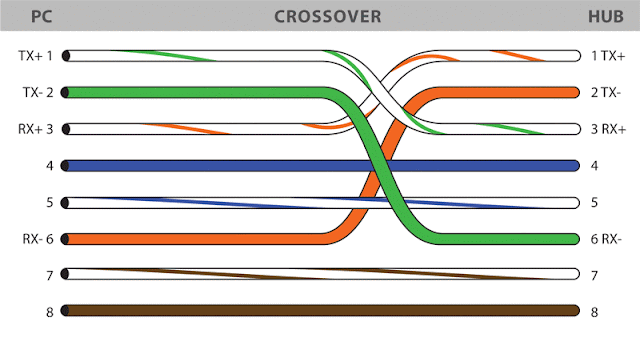
This cable is mainly used for communication b/w two same devices. The color combination you should to make to make is to replace the 1 number cable at one end with the third number cable at the other end & the 2 number cable at the one end with the 6 number cable at the other end. You can use any color combination for it but the standard one use is what I am posting here:
Cross Over Cable
Cross Over Cable
       End A---------------------------------------------------End B
  • White Orange ------------------------------------ White Green 
  • Orange -------------------------------------------- Green 
  • White Green -------------------------------------- White Orange 
  • Blue ------------------------------------------------ Blue 
  • White Blue ----------------------------------------- White Blue 
  • Green ----------------------------------------------- Orange 
  • White Brown -------------------------------------- White Brown 
  • Brown ----------------------------------------------- Brown


3- Roll Over/Console Cable:

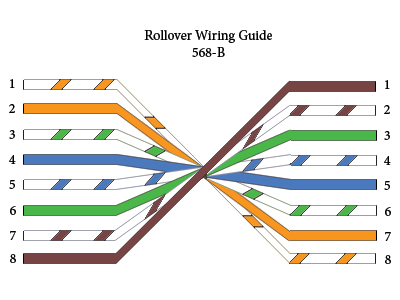
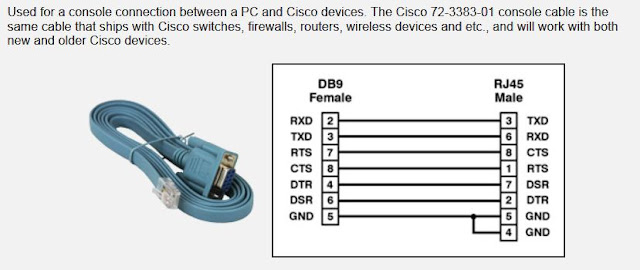
The console cable is mainly used for configuration of switches and routers. The one end of the console cable is RJ-45 and the other end is serial port connector DB-9. You connect the RJ-45 connector to the console port of the router/switch and the DB-9 connector to the serial port of the PC. It is green in color. You can also make a console cable from Ethernet cable if you don't have a console cable. The combination for console cable is given as under:
Console Cable Pin Configuration

Roll Over Cable
Roll Over Cable

Console Cable
Console Cable
        End A-----------------------------------------------End B
  • White Orange ------------------------------------ Brown 
  • Orange -------------------------------------------- White Brown 
  • White Green -------------------------------------- Green 
  • Blue ------------------------------------------------ White Blue 
  • White Blue ----------------------------------------- Blue 
  • Green ----------------------------------------------- White Green 
  • White Brown -------------------------------------- Orange 
  • Brown ----------------------------------------------- White Green

Classification of Devices in networking

Classification of Devices:

The devices in networking has been divided into two groups which are mention below:


Group-1:

The group-1 devices included of :
  1. PC
  2. Server
  3. Router etc

Group-2:

The group-2 devices included of :
  1. Switch
  2. Bridge
  3. Hub
In order to communicate these devices with one another we will use mainly two types of cables, i.e straight Cable & Cross over cable. The straight cable is used for connecting the group-1 devices with group-2 while the cross cable is used for connecting the group-1 devices with group-1 or group-2 devices with group-2, i.e if we want to connect to different group devices then we will use a straight cable else we will use a cross over cable.

9 Aug 2016

All secret Android codes, tips and tricks for your Android mobile devices.


Secret Codes                                 Functions/Description
§  *#06#                                       To check IMEI of your device, enter this code.
§  *#0*#                                       To enter service menu on the very new Android phones.
§  *#0228#                                   To check battery status.
§  *#9090# / *#1111#                  To make device in Service mode.
§  *#*#4636#*#*                        To get information about battery, usage statistics and device.
§  *#34971539#                         To get all information about camera.
§  *#12580*369#                         To get software and hardware info.
§  *#228#                                     For ADC Reading.
§  #7353#                                     To hide test menu 2/Self Test Mode.
§  ##7764726                               To hide service menu for Motorola Droid.
§  *#*#273283*255*663282*#*#*   For backup of our all media files.
§  *#*#232338#*#*                       It display the Wi-Fi mac address.
§  *#7465625#                               To view status of lock-phone.
§  *#*#3264#*#*                           To show RAM version.
§  *#*#44336#*#*                         To display build time and change list number.
§  *#*#232337#*#                         To see or display device’s Bluetooth address.
§  *#*#197328640#*#*                 It enables test mode for service.
§  *#*#8351#*#*                           To enable voice dial mode.
§  *#*#8350#*#*                           To disable the voice dial mode.
§  *#*#0842#*#*                           To test Back-light/vibration.
§  *#*#2664#*#*                           To test the touch-screen.
§  *#*#0289#*#*                           For Audio test.
§  *#*#0*#*#*                               For LCD display test.
§  *#*#232331#*#*                       To test Bluetooth of any Android device.
§  *#*#0283#*#*                           To perform a packet loop-back test.
§  *#*#1575#*#*                           For advanced GPS test.
§  *#*#1472365#*#*                     To Perform a quick GPS test.
§  *#*#0588#*#*                           To perform a proximity sensor test.
§  *#*#7262626#*#*                     To perform field test.
§  *#*#232339#*#*                       Testing Wireless LAN.
§  *#9090#                                     To Diagnose configuration of device.
§  *#872564#                                 To control U-S-B logging.
§  *#9900#                                     System dump mode. 
§  *#*#7780#*#*                           Reset  to factory state.
§  *2767*3855#                             To format Android device.
§  *#*#4986*2650468#*#*          To get pda, phone, H/W and RF Call Date.  
§  *#*#1234#*#*                            To know about pda and firmware version.                                      
§  *#*#1111#*#*                           For FTA Software version. 
§  *#*#2222#*#*                           For FTA Hardware version.
§  *#*#7594#*#*                          To change power button behaviour once code enabled.      
§  *#*#8255#*#*                           To launch Google Talk service monitor.
§  *#*#4636#*#*
This code can be used to get some interesting information about your phone and battery. It shows following 5 menus on screen:
Phone information
Battery information
Battery history
Usage statistics
Wifi information
*#*#7780#*#*
This code can be used for a factory data reset. It'll remove following things:
Google account settings stored in your phone
System and application data and settings
Downloaded applications
*2767*3855#
Think before you give this code. This code is used for factory format. It'll remove all files and settings including the internal memory storage. It'll also reinstall the phone firmware.
*#*#34971539#*#*
This code is used to get information about phone camera. It shows following 4 menus:
Update camera firmware in image (Don't try this option)
Update camera firmware in SD card
Get camera firmware version
Get firmware update count
WARNING: Never use the first option otherwise your phone camera will stop working and you'll need to take your phone to service center to reinstall camera firmware.
*#*#7594#*#*
This one is my favorite one. This code can be used to change the "End Call / Power" button action in your phone. Be default, if you long press the button, it shows a screen asking you to select any option from Silent mode, Airplane mode and Power off.
You can change this action using this code. You can enable direct power off on this button so you don't need to waste your time in selecting the option.
*#*#273283*255*663282*#*#*
This code opens a File copy screen where you can backup your media files e.g. Images, Sound, Video and Voice memo.
*#*#197328640#*#*
This code can be used to enter into Service mode. You can run various tests and change settings in the service mode.
WLAN, GPS and Bluetooth Test Codes:
*#*#232339#*#* OR *#*#526#*#* OR *#*#528#*#* - WLAN test (Use "Menu" button to start various tests)
*#*#232338#*#* - Shows WiFi MAC address
*#*#1472365#*#* - GPS test
*#*#1575#*#* - Another GPS test
*#*#232331#*#* - Bluetooth test
*#*#232337#*# - Shows Bluetooth device address
*#*#8255#*#*
This code can be used to launch GTalk Service Monitor.
*#*#4986*2650468#*#* - PDA, Phone, H/W, RFCallDate
*#*#1234#*#* - PDA and Phone
*#*#1111#*#* - FTA SW Version
*#*#2222#*#* - FTA HW Version
*#*#44336#*#* - PDA, Phone, CSC, Build Time, Changelist number
*#*#0283#*#* - Packet Loopback
*#*#0*#*#* - LCD test
*#*#0673#*#* OR *#*#0289#*#* - Melody test
*#*#0842#*#* - Device test (Vibration test and BackLight test)
*#*#2663#*#* - Touch screen version
*#*#2664#*#* - Touch screen test
*#*#0588#*#* - Proximity sensor test
*#*#3264#*#* - RAM version
NOTE: All above codes have been checked on Google Android phone Samsung Galaxy I7500 only but they should also work in other Google Android phones.